Hidden MIDI Keyboard - Online Help
Antivirus warning / Download blocked
The app contains an AutoHotKey script. Years ago all antiviruses detected these scripts as viruses/trojans due to their characteristics. Currently, most antiviruses have been updated and detect that AutoHotKey is safe, although some still do not.
You can upload the exe file to virustotal.com and you will see that all the major antiviruses mark it as safe. Only a few showing it as unsafe, which is known as a false positive.
If your antivirus blocks the app from running, add the exe file to the exceptions list.
Some browsers may block the download. As mentioned above, you can allow the download safely. The procedure for allowing blocked downloads varies depending on the browser used.
Installation and execution
Extract the downloaded ZIP file and run the “Hidden MIDI Keyboard.exe” file to start the app. An icon will appear in the system tray. To close the app, right click on the system tray icon and select Exit.
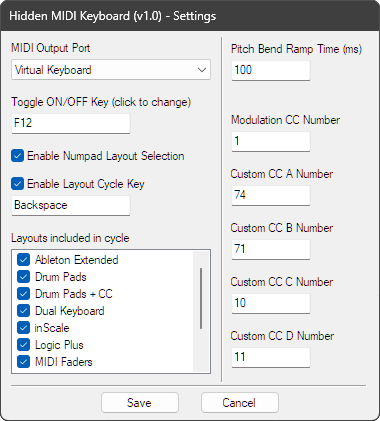
The activation key is F12 by default, but it can be customized. A pop-up message will appear under the mouse pointer each time the app is activated/deactivated, as well as other messages related to layout changes, octave or velocity.
A virtual MIDI port is required for communication between the app and the DAW. You can use loopMIDI by Tobias Erichsen for the creation of the virtual MIDI port. Simply assign a name and use the [+] button to create the port.
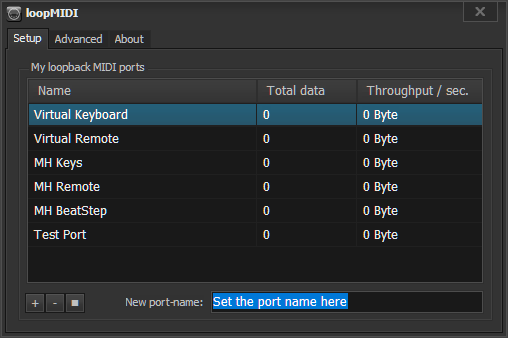
Once the port is created, select it in the Hidden MIDI Keyboard settings and as a MIDI input in your DAW.
Settings
Right-clicking the system tray icon to open the app settings. Here you select the MIDI port to use, as well as the keys assigned to activate/deactivate the app. Also shown are the settings related to layout selection, pitch bend wheel action time, and CC numbers used by the predefined layouts. The MIDI channel selector is located in the system tray icon menu, not in this window.
The following image shows the app’s main keys. These are independent of the layout used. As you can see in the settings, the on/off and layout cycle keys can be customized. But the numeric keypad keys, used for direct layout changes, are not customizable. Although they can be disabled in the settings if you wish to use them in a custom layout.
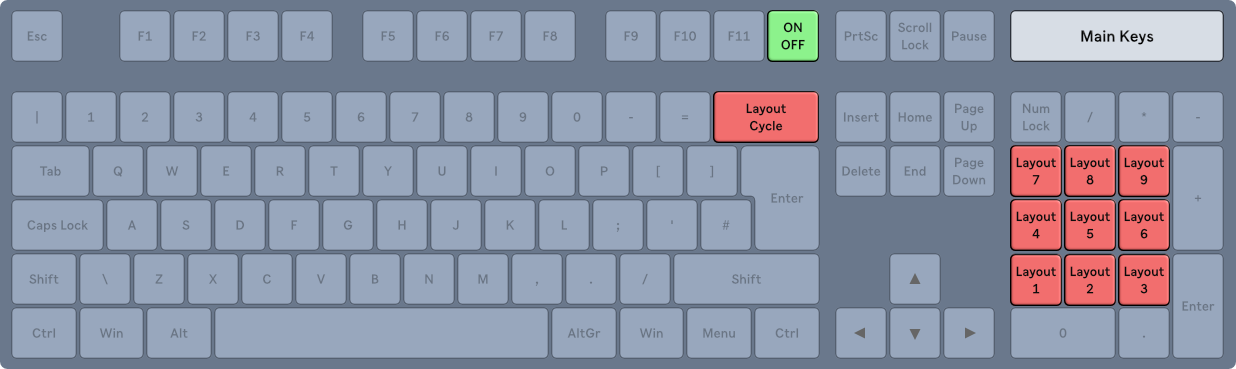
The layout change keys operate based on the layouts selected in the layout list in the settings window. This means that the Layout Cycle key only cycles through the selected layouts. And the numeric keypad keys correspond to the first 9 layouts selected in the list, omitting any that are not selected.
You can also switch layouts by clicking the system tray icon, where all layouts are displayed.
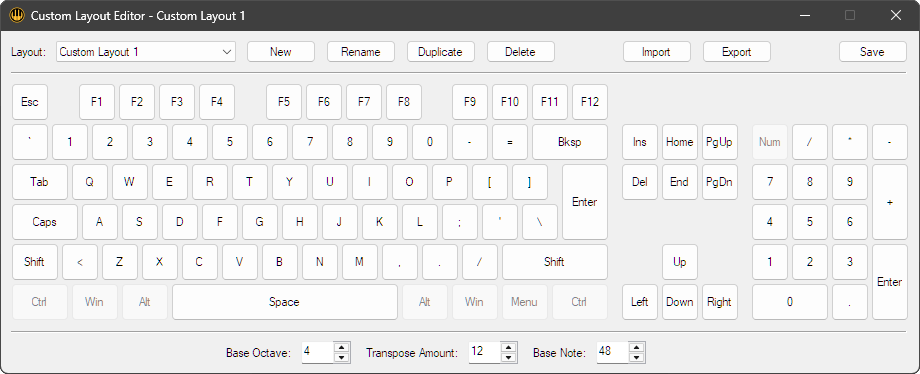
Custom Layout Editor
The editor is accessed via the system tray icon. It allows you to create as many layouts as you like. These will be available in the layout list of the settings window to include when changing the layout.
The top controls include layout selection and actions such as create/delete, import/export, etc. Note that predefined templates cannot be edited. If you want to modify a predefined template, you must create a new template and configure it in the same way as the predefined one.
The controls at the bottom set values used by the template regarding:
- Base Octave: The octave in which the layout will start when the app launches.
- Transpose Amount: The number of notes transposed by the octave [-] [+] keys.
- Base Note: MIDI notes can be configured as fixed (always the same note value) or relative to the value set by this control.
Remember to click the Save button before closing the window.
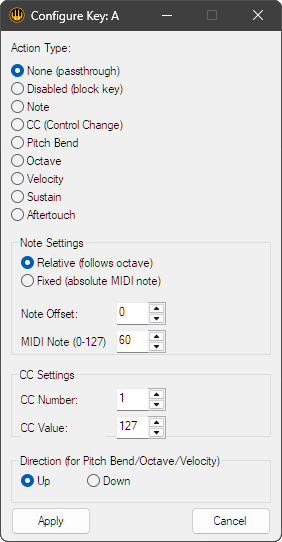
Clicking a key displays its configuration window. The default setting (None) means the key will not be used by the layout and will therefore function normally in the operating system. Setting it to Disabled means the key will be blocked and cannot be used by either the layout or the operating system. This can be useful, for example, for keys between black notes, to avoid accidentally pressing keys and sending unwanted keystrokes to the DAW.
The remaining options determine the type of MIDI data sent by the key. Their function is fairly self-explanatory. Just to clarify, there are two options for sending notes: Relative and Fixed.
- Select Relative if you want to use octave transposition. In that case, set an offset value for the note. This is the note value relative to the one set in the Base Note control (main editor window).
- The Fixed option sets a fixed value that does not change with octave transposition. When this option is selected, set the note value in the filed: MIDI Note (0-127).
For the Pitch Bend, Octave, and Velocity options, set their use at the bottom to either increase or decrease the control value when the key is used.